Azure AI Foundry — 多代理编排与工作流
Azure AI Foundry(前身为 Azure AI Studio)是微软提供的端到端平台,用于构建、测试、部署和监控 AI 代理及应用程序。它将模型、工具、框架和治理能力整合到一个统一的系统中。
现代企业自动化往往需要多个 AI 系统协同完成任务。与其让单一的大型语言模型承担所有工作,Azure AI Foundry 引入了多代理编排机制——让专业化的 AI 代理在工作流中相互协作。
微软将这一方式定义为:利用 SDK 和编排层构建先进的自动化系统,从而实现代理间的协同行为与复杂工作流。
在 Azure AI Foundry 中,代理是具备以下能力的模块化 AI 服务:
- 大语言模型(LLM)
- 工具 / API
- 知识库
- 记忆
- 指令
工作流作为编排层,决定代理之间如何交互、交换数据并执行任务。
工作流可以通过以下方式协调多个代理:
- 顺序逻辑
- 分支条件
- 并行执行
- 人工审批介入
这使得构建以下企业级 AI 自动化流水线成为可能:
- 文档处理系统
- 客户支持代理
- 研究自动化
- 软件开发辅助
- 金融分析助手
工作流以可重复的流程编排多个代理,同时支持分支逻辑、变量传递与人工干预步骤。
Azure AI Foundry 多代理系统的核心架构
Foundry 中的多代理系统由以下几个层次组成。
代理层
代理是专业化的 AI 工作单元。
示例:
- 研究代理
- 摘要代理
- 数据检索代理
- 合规代理
每个代理包含:
- 系统提示词
- 模型配置
- 工具(API、搜索、数据库)
- 记忆 / 知识来源
代理基于 Azure AI Foundry Agent Service 构建,该服务为部署和管理智能代理提供了企业级的基础设施。
编排层
编排层负责协调代理之间的交互。
主要职责包括:
- 任务分解
- 代理选择
- 执行顺序管理
- 上下文共享
- 错误处理
- 输出综合
编排方式包括:
- 工作流编排(可视化或 YAML)
- 编排代理
- 代理框架图编排
工作流引擎
工作流引擎定义执行图。
包含以下要素:
- 节点(代理调用)
- 边(数据流向)
- 条件路由
- 变量
- 状态
工作流帮助开发者将 AI 推理能力与业务逻辑有机结合。
基础设施层
常用的 Azure 资源包括:
- Azure AI Foundry
- Azure AI Search
- Azure Cosmos DB(状态存储)
- Azure Container Apps(代理运行环境)
- Azure Key Vault
- Azure Monitor
典型架构使用中央 API 编排器,协调部署在云基础设施中的多个专业代理。
多代理编排模式
Azure 推荐以下几种编排模式。
顺序工作流
上一个代理的输出作为下一个代理的输入。
示例:
用户查询
   ↓
研究代理
   ↓
摘要代理
   ↓
回答代理
条件工作流
根据输出结果进行路由。
示例:
用户查询
   ↓
意图分类器
   ├── 支持代理
   └── 销售代理
并行工作流
多个代理同时运行。
示例:
用户查询
   ↓
并行代理
   ├── 网络搜索代理
   ├── 数据库代理
   └── 知识库代理
层级式(编排代理)
由主代理协调子代理。
编排代理
   ├── 研究代理
   ├── 代码代理
   └── 摘要代理
连接代理允许主代理将任务委托给专业子代理,从而构建模块化、可扩展的系统。
Azure AI Foundry 的工作流概念
工作流系统引入了以下几个关键抽象概念。
节点
节点代表执行步骤。
类型包括:
- 代理节点
- 工具节点
- 条件节点
- 人工审批节点
- 转换节点
变量
变量用于在步骤之间共享数据。
示例变量:research_result、summary、final_answer
变量可以在工作流各阶段中存储和复用。
分支
工作流通过表达式支持条件逻辑。
示例:
if sentiment == negative
   route_to = escalation_agent
人工介入(Human-in-the-loop)
某些步骤可能需要人工审核。
示例:
代理生成合同摘要
↓
人工审批
↓
发送给客户
这对受监管行业至关重要。
工作流的执行过程
用户请求
      ↓
工作流触发
      ↓
代理节点
      ↓
输出变量
      ↓
条件路由
      ↓
下一个代理
      ↓
最终输出
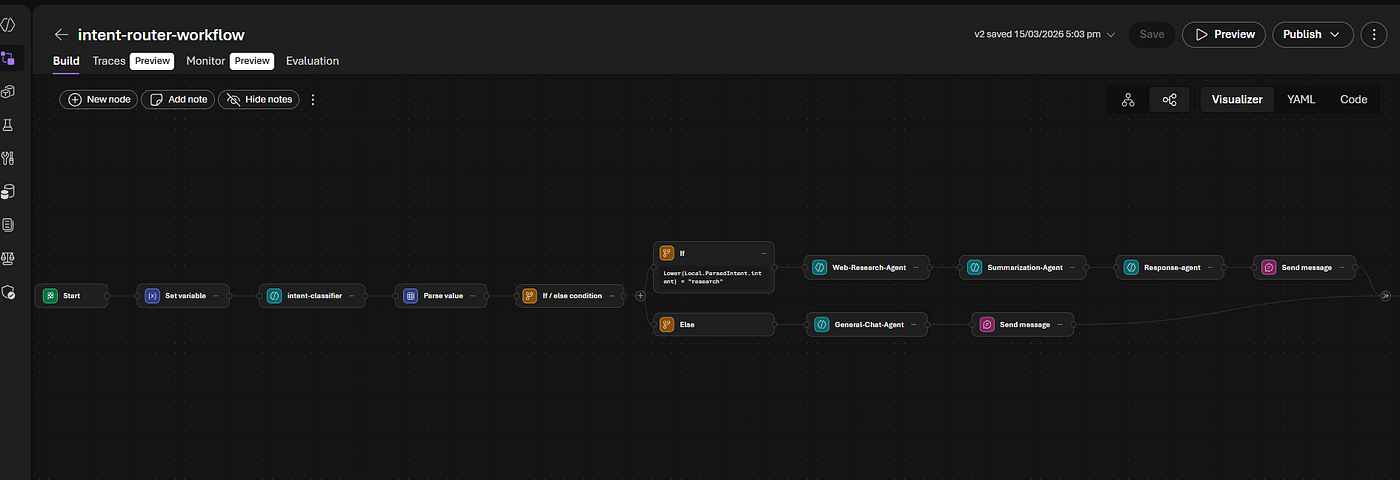
在 Azure AI Foundry 门户中创建工作流
我们将实现以下架构:
OnConversationStart (触发器)
    ↓
SetVariable  →  Local.UserInput = System.LastMessage.Text
    ↓
InvokeAzureAgent  →  intent-classifier
    ↓  (输出: Local.IntentMessages)
ParseValue  →  Local.ParsedIntent.intent
    ↓
ConditionGroup  →  Lower(Local.ParsedIntent.intent) = "research"
    │
    ├── [research] Web-Research-Agent
    │       ↓ Local.LatestMessage
    │   Summarization-Agent
    │       ↓ Local.LatestMessage
    │   Response-agent
    │       ↓ Local.LatestMessage
    │   SendActivity → Last(Local.LatestMessage).Text
    │
    └── [else/chat] General-Chat-Agent
            ↓ Local.LatestMessage
        SendActivity → Last(Local.LatestMessage).Text
第一步 — 启用 New Foundry 并创建项目
- 登录 ai.azure.com
- 点击右上角的 New Foundry 开关,将其打开
- 点击右上角菜单中的 Build
- 点击 + New Project
- 输入项目名称(例如
my-agent-project) - 选择或创建一个 Hub,选择 Azure 区域,然后点击 Create
第二步 — 部署模型
代理需要已部署的语言模型。GPT-4o-mini 非常适合开发阶段——速度快且成本低。
- 在项目左侧导航栏中,进入 My Assets → Models + Endpoints
- 点击 + Deploy Model → Deploy Base Model
- 搜索 gpt-4o-mini 并选中
- 接受默认配置,点击 Confirm
- 等待部署状态变为 Succeeded
提示:请记下部署名称,配置每个代理时需要用到。
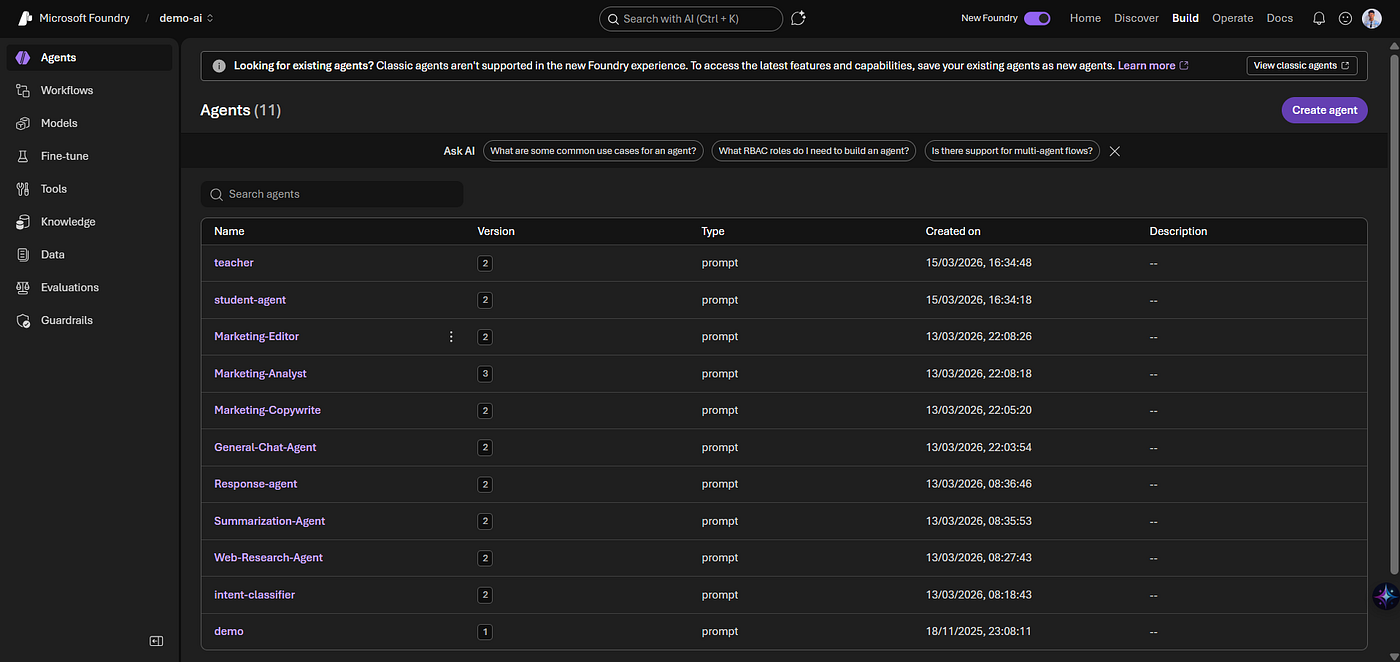
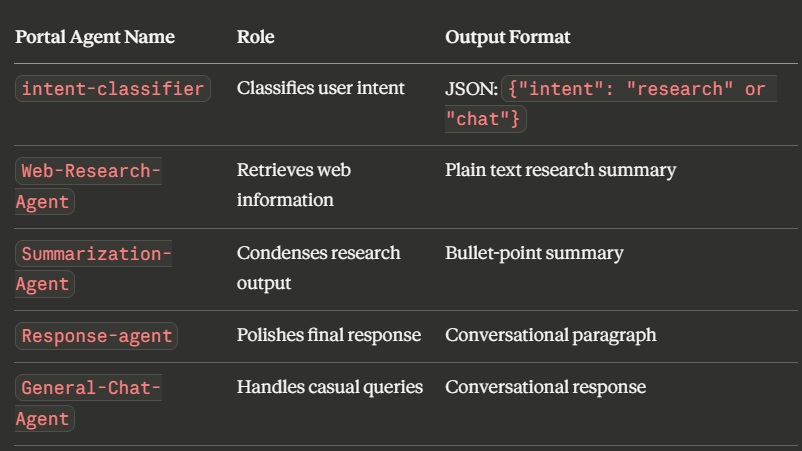
第二部分 — 创建代理
本工作流需要五个代理,每个代理职责明确。以下是在门户中使用的确切名称——名称区分大小写,且必须与 YAML 完全一致。
如何创建每个代理
- 在左侧导航栏的 Build & Customize 下,点击 Agents
- 点击 + Create Agent
- 填写:名称、模型(你的 gpt-4o-mini 部署)和指令
- 点击 Save
第三部分 — 各代理的系统提示词
正确设置系统提示词是最关键的步骤。
代理 1:intent-classifier(意图分类器)
You are an intent classifier.
Your sole task is to read the user's message and classify their intent.
Respond ONLY with a valid JSON object in exactly this format:
  {"intent": "research"}   — if the user is asking for facts, news,
                              current events, or information requiring lookup
  {"intent": "chat"}       — for all other messages (greetings, opinions,
                              general questions, casual conversation)
Rules:
- Output ONLY the JSON object. No explanation, no markdown, no extra text.
- Never wrap in code blocks or backticks.
- Default to {"intent": "chat"} if unsure.
额外步骤——在代理配置中设置 JSON Schema 响应格式:在代理配置中,点击 Details → 参数图标(⚙)→ Text Format: JSON Schema,然后粘贴以下内容:
|
|
代理 2:Web-Research-Agent(网络研究代理)
You are a web research specialist.
Given a user query, search for the most relevant and up-to-date information.
Return a detailed, factual summary of your findings.
Include key points, statistics, and recent developments where relevant.
Output your research as a structured block of text — no JSON, no markdown headers.
请为此代理启用 Bing Search 工具,以便它能够实时获取网络搜索结果。
代理 3:Summarization-Agent(摘要代理)
You are a summarization specialist.
You receive raw research text as input.
Your task: condense it into a clear, concise summary of 3–5 bullet points.
Each bullet should be one sentence capturing a key insight.
Do not add commentary or ask questions. Output only the bullet points.
代理 4:Response-agent(回复代理)
You are a response formatter and polisher.
You receive a summarized bullet-point list as input.
Your task: rewrite it into a clear, professional, conversational paragraph
suitable for the end user. Maintain accuracy. Improve clarity and tone.
Output only the final polished response. No preamble, no sign-off.
代理 5:General-Chat-Agent(通用聊天代理)
You are a friendly, knowledgeable AI assistant.
Respond helpfully and conversationally to the user's message.
Be concise, warm, and clear. Avoid unnecessary disclaimers.
If the question requires factual research, say so and ask the user
to rephrase their query for a deeper investigation.
第四部分 — 构建工作流
第一步 — 创建工作流
- 在右上角菜单中,点击 Build
- 点击 Create new workflow
- 选择 Sequential 作为起始模板
- 将工作流命名为
intent-router-workflow - 打开 YAML Visualizer View 开关
⚠️ Foundry 不会自动保存。每次修改后请手动点击 Save。
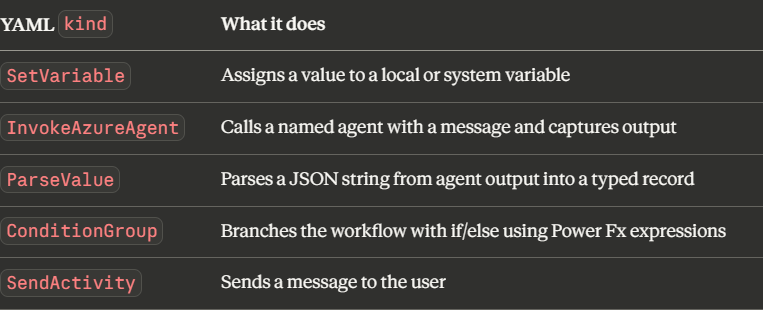
第二步 — 了解节点类型
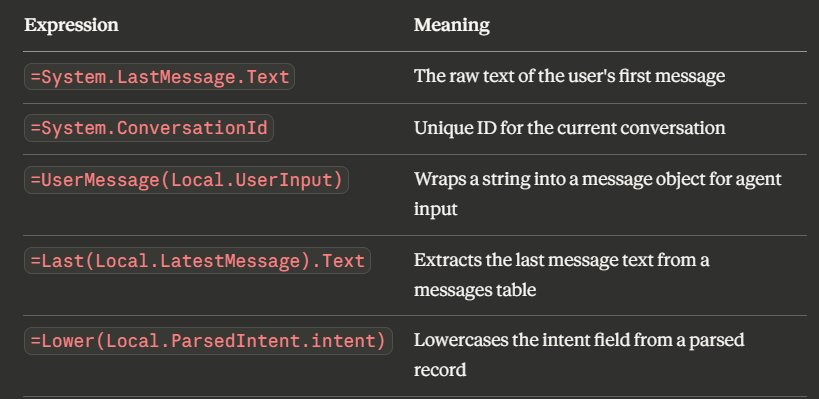
第三步 — 关键变量与 Power Fx 表达式
工作流使用类似 Excel 公式的 Power Fx 来编写表达式:
第五部分 — 完整 YAML
将以下内容直接粘贴到 Foundry 工作流构建器的 YAML 编辑器中:
|
|
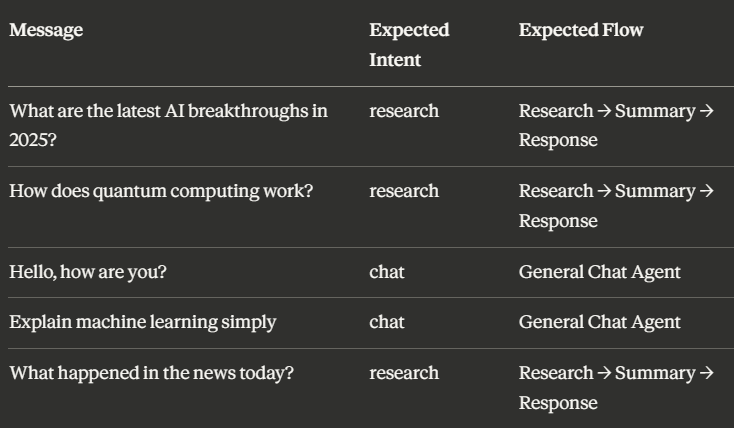
第六部分 — 测试工作流
- 在工作流构建器中点击 Save
- 点击 Run Workflow——右侧会弹出聊天面板
- 输入一条测试消息并按回车键
- 观察可视化界面——每个节点执行时会高亮显示
- 查看 Logs 面板,查看每个步骤的变量值

参考资源
- 本文作者:BeanHsiang
- 本文链接:https://beanhsiang.github.io/post/2026-03-26-azure-ai-foundry-multi-agent-orchestration-and-workflows/
- 版权声明:本作品采用知识共享署名-非商业性使用-禁止演绎 4.0 国际许可协议. 进行许可,非商业转载请注明出处(作者,原文链接),商业转载请联系作者获得授权。